
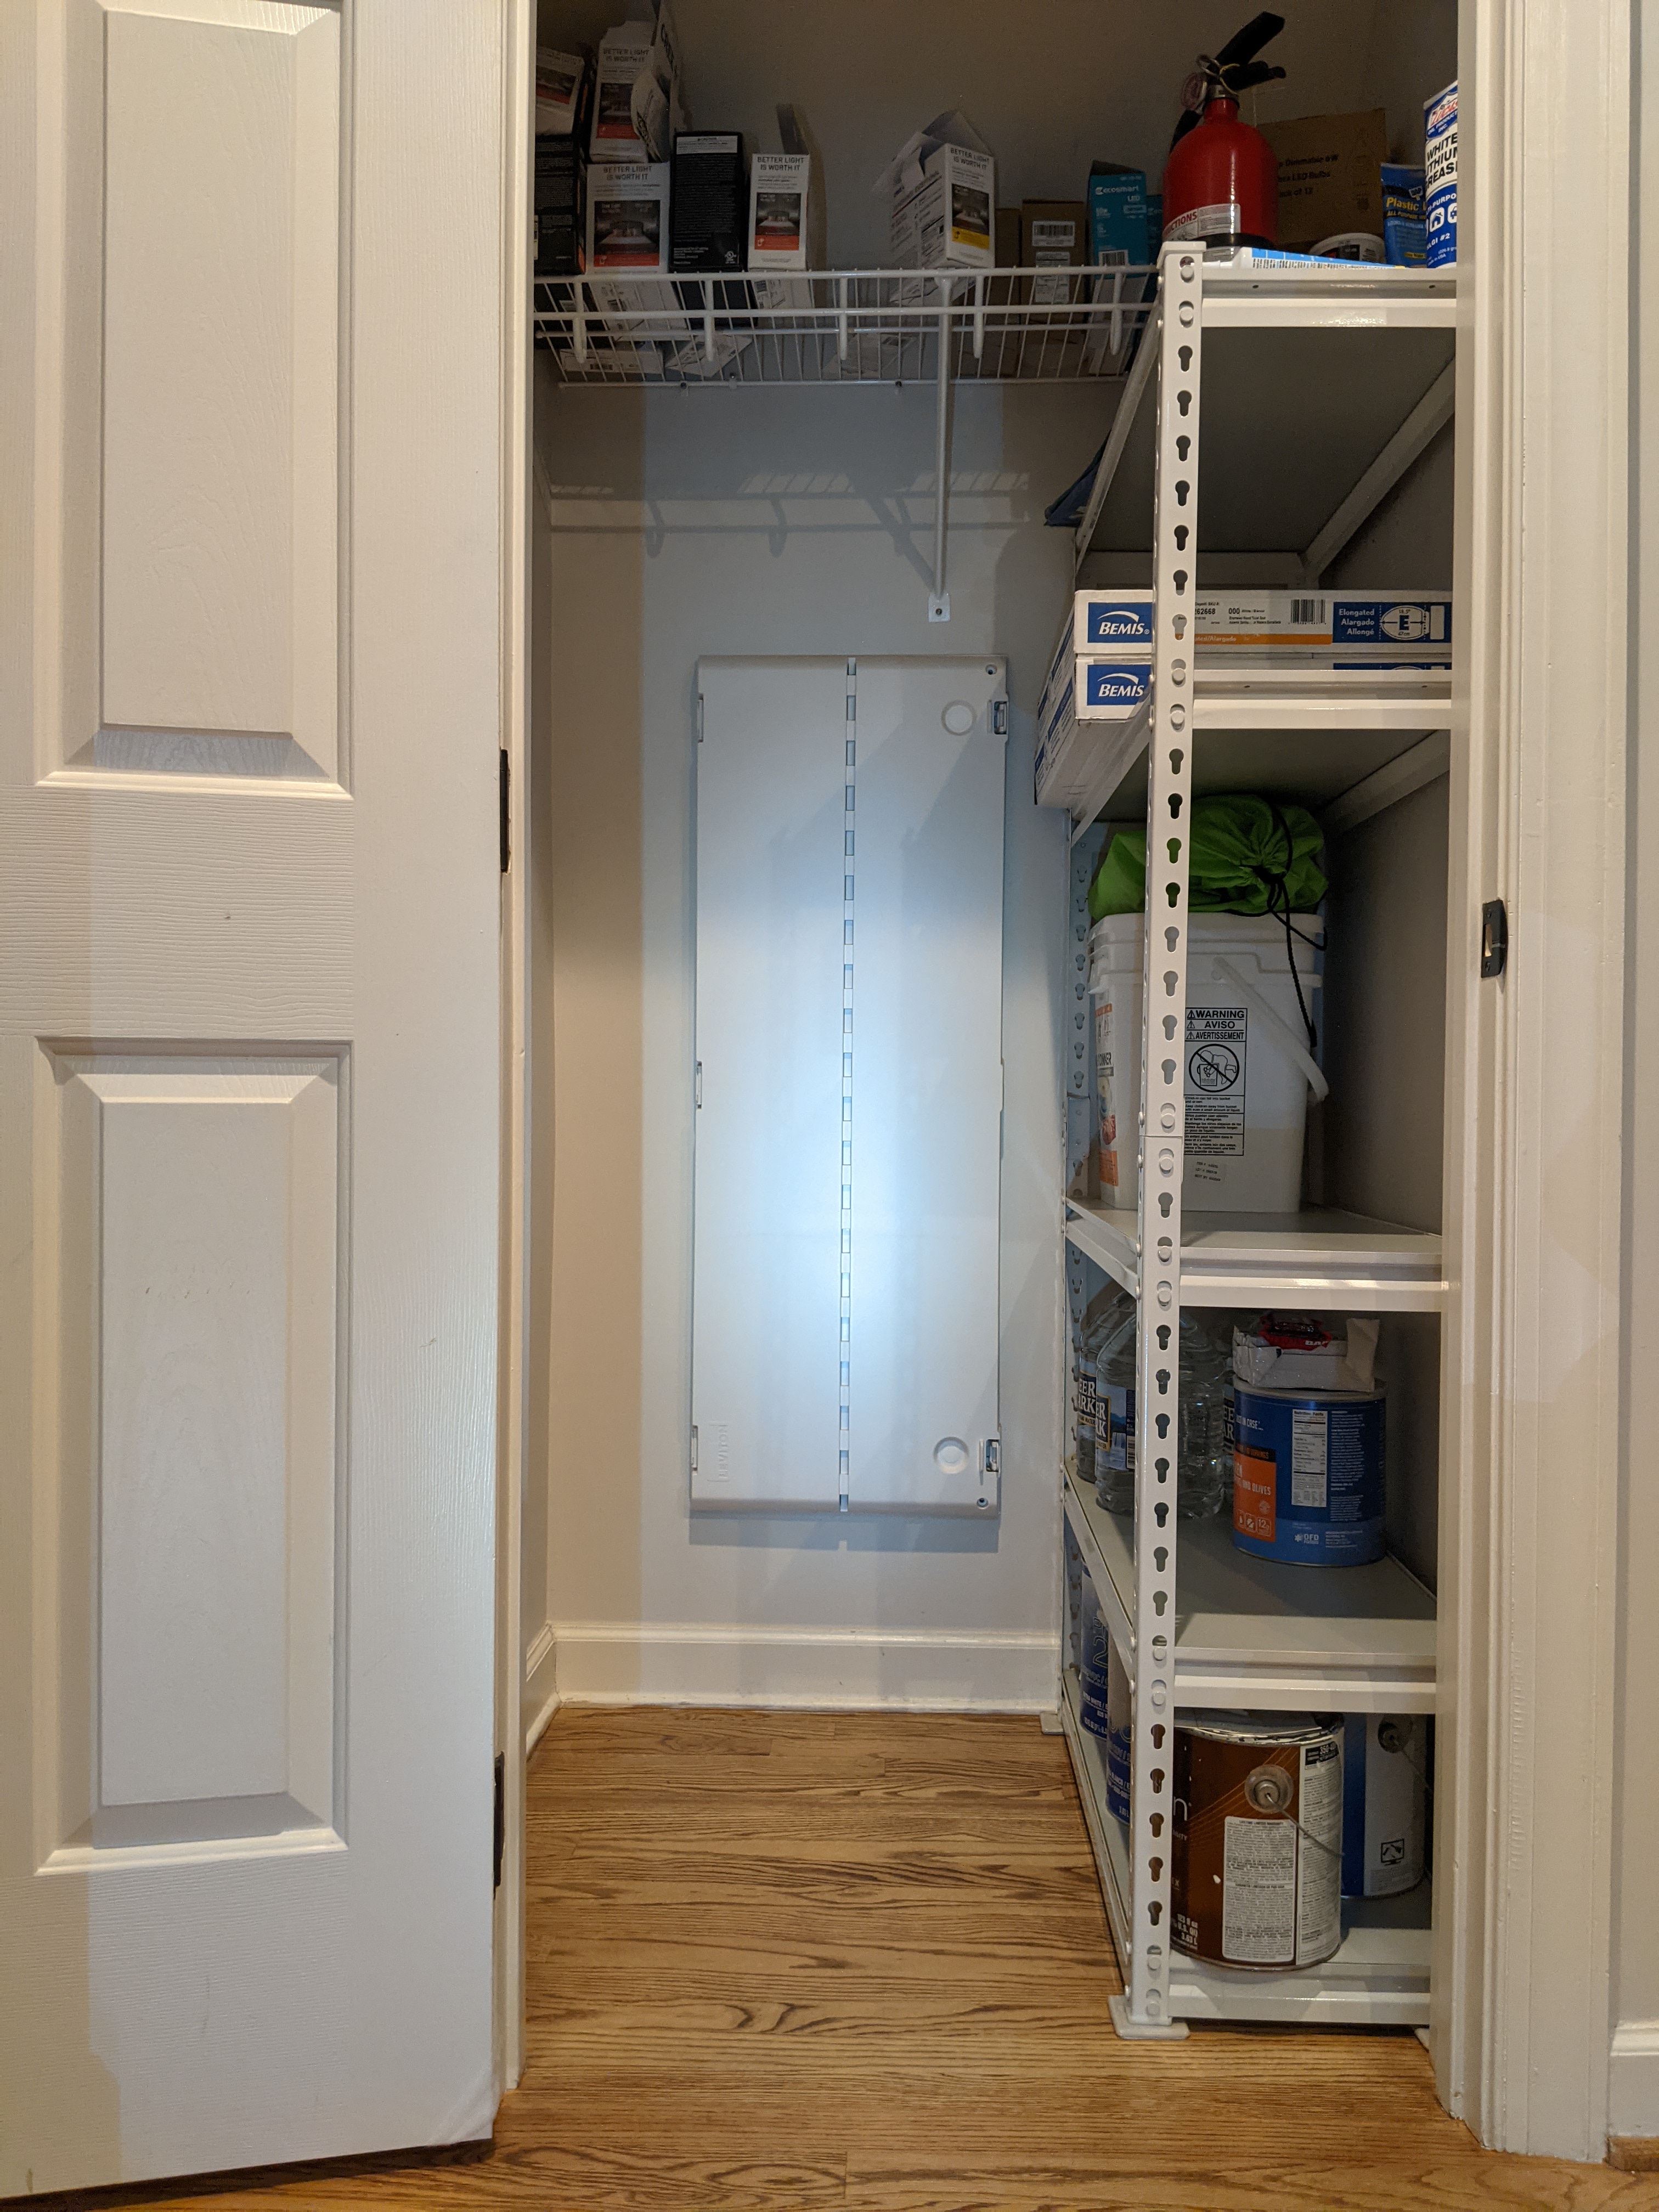
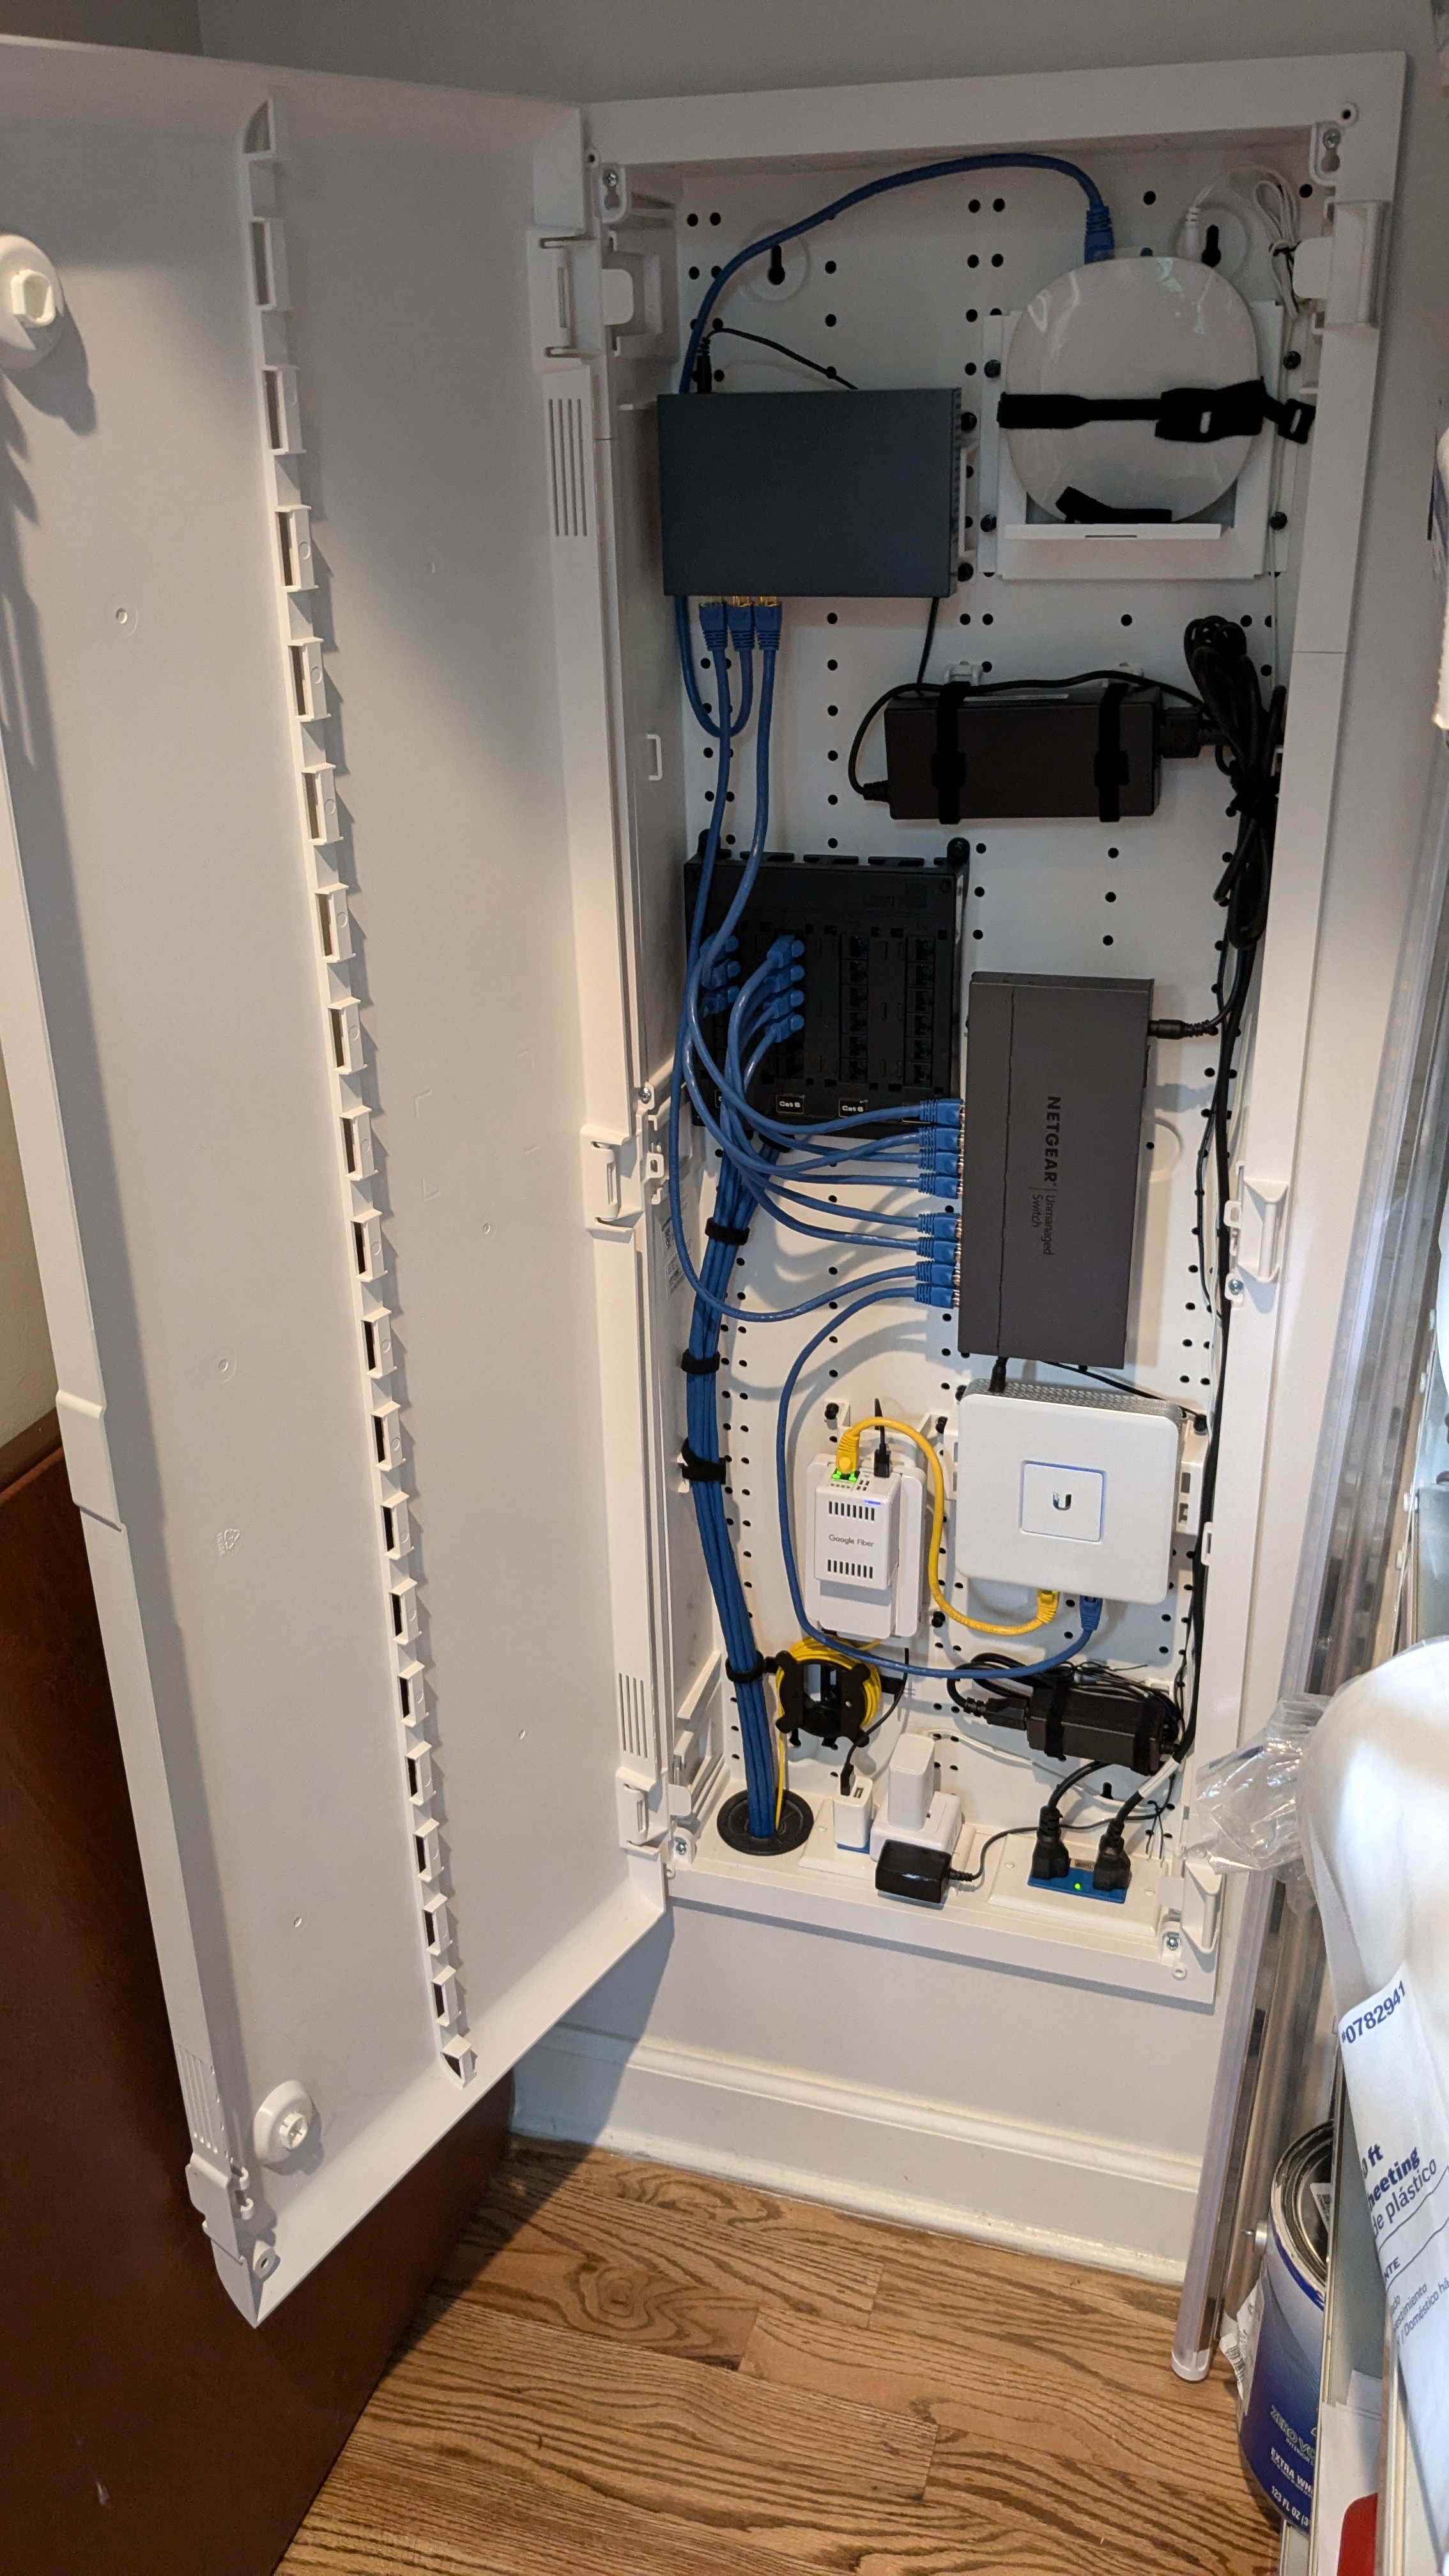
I did some home networking! Four years ago. I installed some networking equipment in a closet, ran a bunch of Ethernet cable, and ceiling-mounted a Wi-Fi access point. The closet box looks like this (click pics for a bigger size):
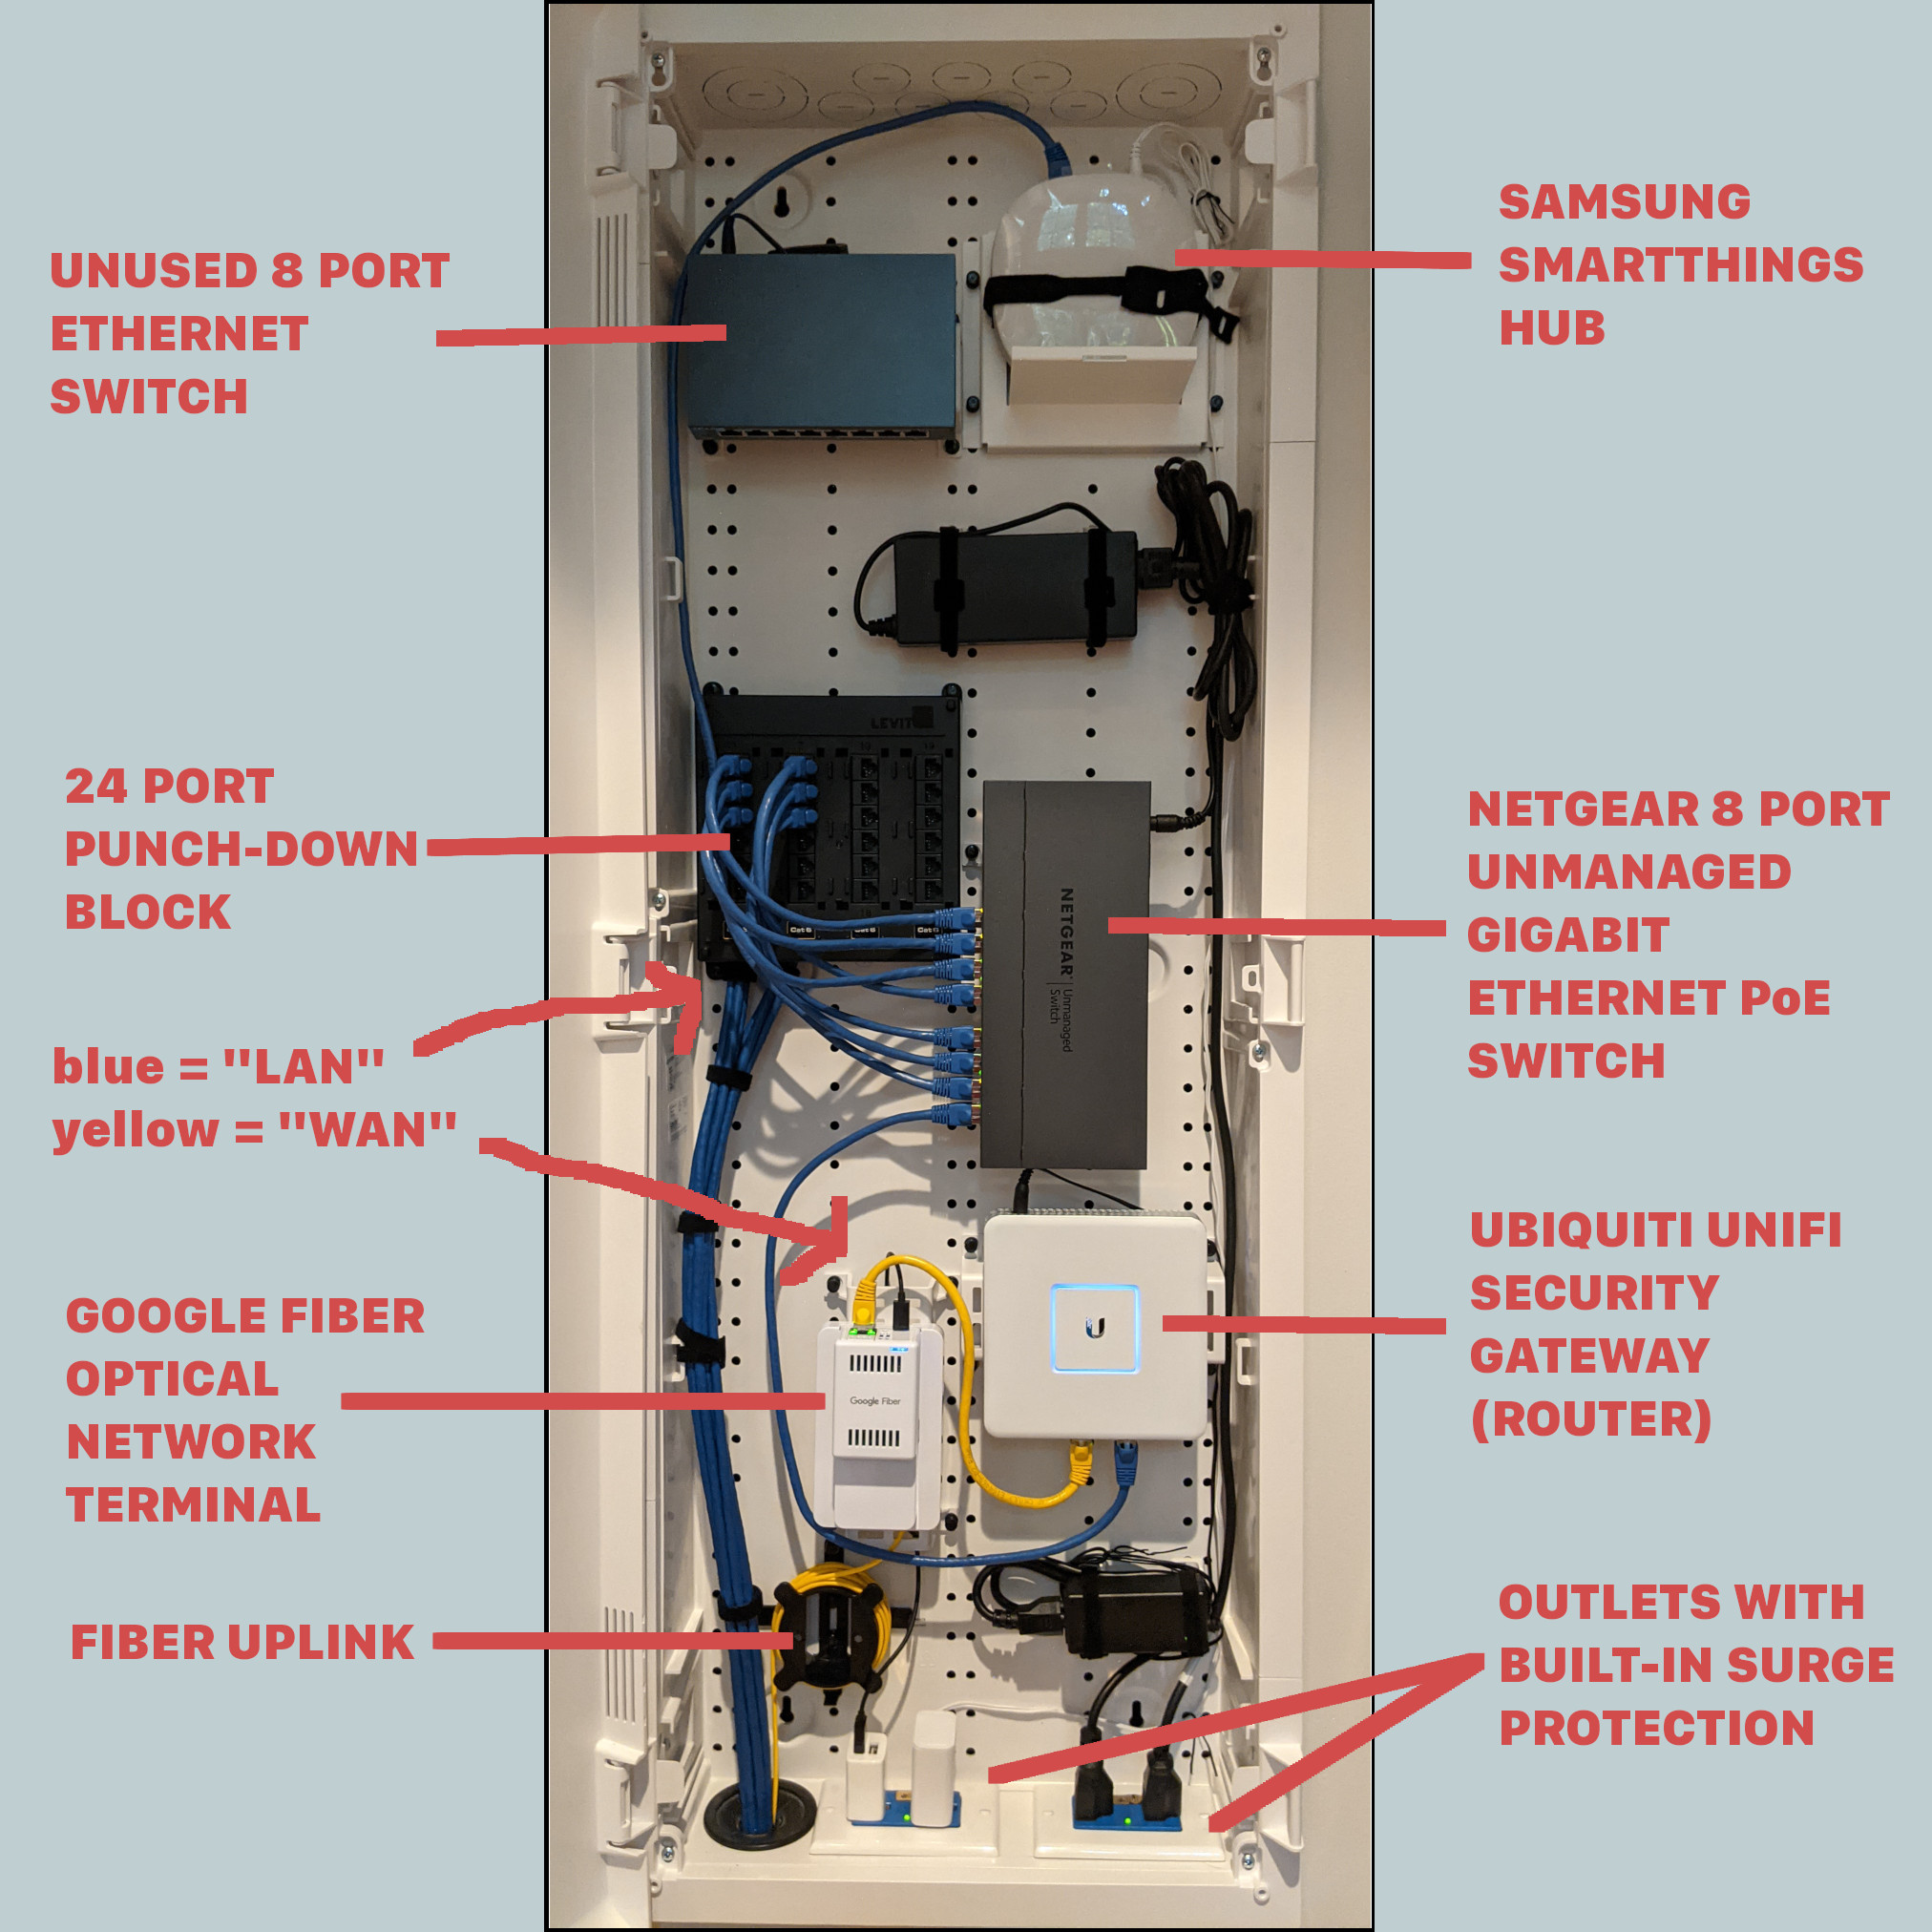
And here’s an annotated version:
But let’s back up a bit…
Why???
Two primary reasons.
The first is that our router was in our living room and I wanted it to be less conspicuous.
The second is that I wanted to run Ethernet cable because I don’t like Wi-Fi. Before this house I lived in semi-dense apartments and condos for fifteen years and sometimes had Wi-Fi problems. Nothing terrible, just an occasional annoyance. Things like Wi-Fi speakers or a Nest camera dropping offline, presumably due to lots of access points using the same limited spectrum (using a phone app to view Wi-Fi networks would show a handful of networks with strong signals).
Also, it’s maybe silly but I still have a Linux desktop computer and it’s nice to not have to spend any effort making Wi-Fi work in Linux.
What About Mesh Networks or Range Extenders?
Mesh networks are all the rage these days. I don’t have experience with them. I suspect they work well. They do use additional bandwidth, though, because data is transmitted over multiple hops. And yeah, hopefully transmitted at lower power and that should reduce interference. But there’s still overall more data transmission.
Basically nothing beats a physical Ethernet connection. And any traffic you can remove from the wireless network will increase the experience of the remaining wireless devices because there’s less contention.
My house has a fairly accessible crawlspace and attic, so running cable isn’t terrible. And I’m planning on living here for a while so it seemed worth the effort.
So What Exactly Did I Do?
The picture above shows a structured media enclosure (or structured media center). It’s a big box that you can mount stuff in. This one is sized to fit between 16″ studs. I cut a big rectangular hole in the drywall in a downstairs closet and screwed it to the studs. I had an electrician wire up two duplex power receptacles. The cabinet contains the fiber to Ethernet media converter (called an optical network terminal), our router, an Ethernet switch, a SmartThings hub, and an Ethernet punch-down block.
I ran our incoming fiber cable to the cabinet and I ran four Cat 6A Ethernet cables from the cabinet to the office and four to the upstairs (TV in bonus room, an access point, and two spares). I luckily found an existing conduit running between the attic and the crawlspace that only had a few coax cables in it. I was able to reuse this for Ethernet cable. I loosely suspended the cable with velcro ties nailed to studs. I drilled holes up through the floor bottom plate or down through the ceiling top plate into the specific stud cavity where I wanted the Ethernet jack. I used Great Stuff fireblock foam to fill the holes after running the cable.
There Were So Many Little Decisions!
Making these decisions took time, research, and planning.
The Structured Media Enclosure Itself
The two big name brands are Leviton and Legrand. There are other brands but it’s harder to find info about them online. I went with Leviton and I don’t remember why. It’s fine. I suspect Legrand is fine, too. Even with Leviton it was hard for me to get a good idea in my head about how well it would work.
One worry I had was about installing the box when we already had drywall in place. The box comes with tabs that stick out on the sides and you’re supposed to screw them straight into studs before installing drywall (so the tabs go behind the drywall). But eventually I found one of their YouTube videos that demonstrates scoring the tabs with a knife and snapping them off, then screwing into the studs through the sides of the box. This allows the box to sit at the right depth in the wall. So that’s great. Though I wish this info was easier to find. Pet peeve: YouTube how-to videos that could have been a text article with images.
Another worry I had was how to attach things in the box. Both Leviton and Legrand sell mounting brackets and in both cases the mounting brackets are quite expensive for what they are. Like $20 or $30 each, for a little plastic or metal bracket. They’re pretty basic so their profit margin is likely high for these things. It’s kinda justified in that their sales volume is probably low and they have to recoup their development cost and overhead… but it’s still a hard pill to swallow. Here are Leviton’s mounting options.
I got kind of a gigantic box—42″ tall. It seemed bigger than I needed but also I had room for it and I thought the extra space might come in handy. This was a good choice! I found it hard to arrange things compactly. Partially because I tried hard to keep it tidy and tried to keep power cables separated from Ethernet. But also it was just hard to mount things side by side. The flexibility of Legrand’s universal mounting plate might be nice here. But I still have a decent amount of space and I could cram more stuff in there if I wanted.
Putting the SmartThings hub in the closet isn’t great for reception but it seems to mostly work fine. Maybe because I have a Z-Wave range extender/repeater plugged into an outlet outside the closet (Aeotec Range Extender 7, possibly discontinued). I did at least get the enclosure that’s made out of plastic instead of metal.
Ethernet Cable
There’s like a billion different kinds of Ethernet cables. I went with Cat 6A, which seems to offer the most bandwidth while still being a widespread standard. I went with plain old unshielded twisted pair (UTP) because foil shielding seemed unnecessary for my use case. I wanted to use pre-terminated cables because terminating is a pain and I was worried it would be less reliable if I did it myself. But I ended up buying unterminated cable on a spool because the longest terminated Cat 6A cable I could find was 100ft and I estimated that I needed a cable longer than that for the TV. Plus it was hard to estimate accurately and therefore hard to know what lengths to buy. The spool was solid core, which is what I wanted. I suspect most spools are solid core, since spools are probably mostly used for permanent installations. My worries were unnecessary—terminating wasn’t too bad and I think I was able to do a good job. And pulling the connectors+boots of pre-terminated cable through my conduit would have been harder.
I bought “riser-rated” (“CMR”) cable, but any cable rated for in-wall use is fine: CM, CL, CMR, or CMP. I think this page gives a good enough explanation while still being brief.
I chose a blue sheath because in my mind blue gives the biggest hint that “this is data” or “this is Ethernet.” But maybe that’s just me.
Connectors, Faceplates, and Boxes
And that lead to the decision to use a punch-down block and punch-down wall connectors rather than terminating with an RJ45 connector and plugging directly into a switch or into a pass-through wall connector. It seemed like the more professional route and I’m happy with these decisions. Here’s what the punch-down block looks like from the front:
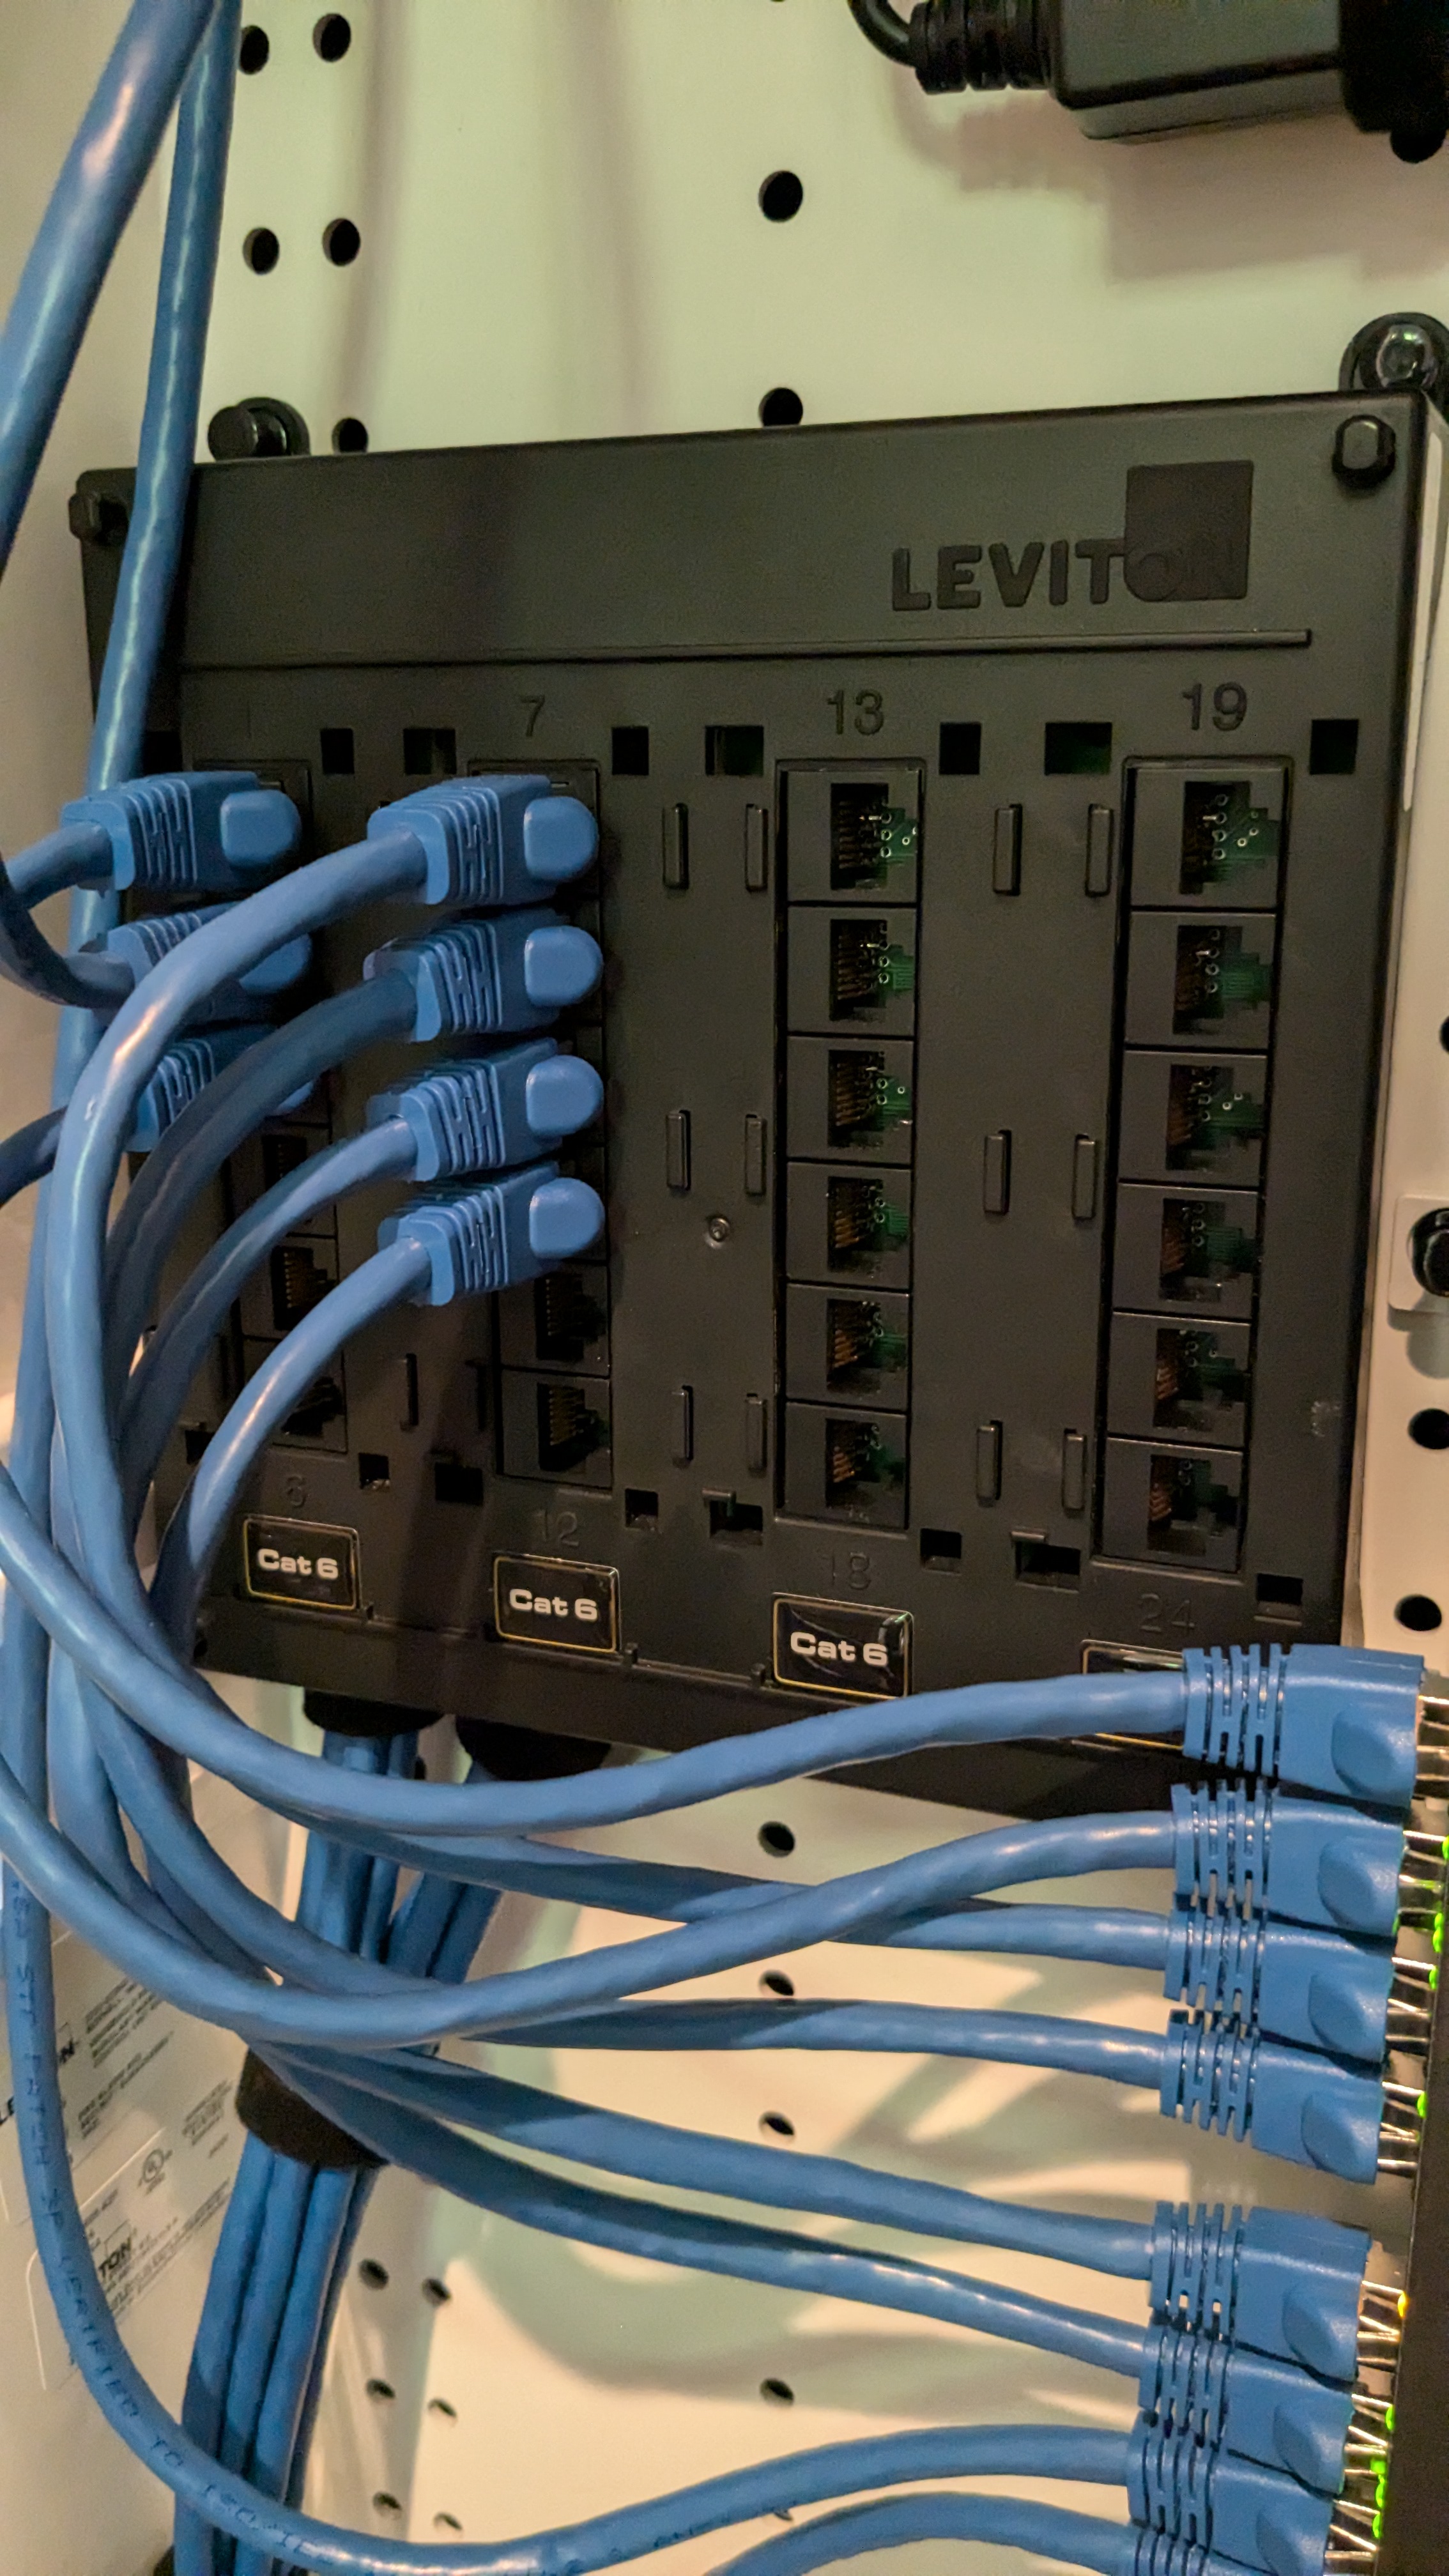
To access the back, where the cables attach, you unhook the punch-down block from the structured media enclosure and turn it over.
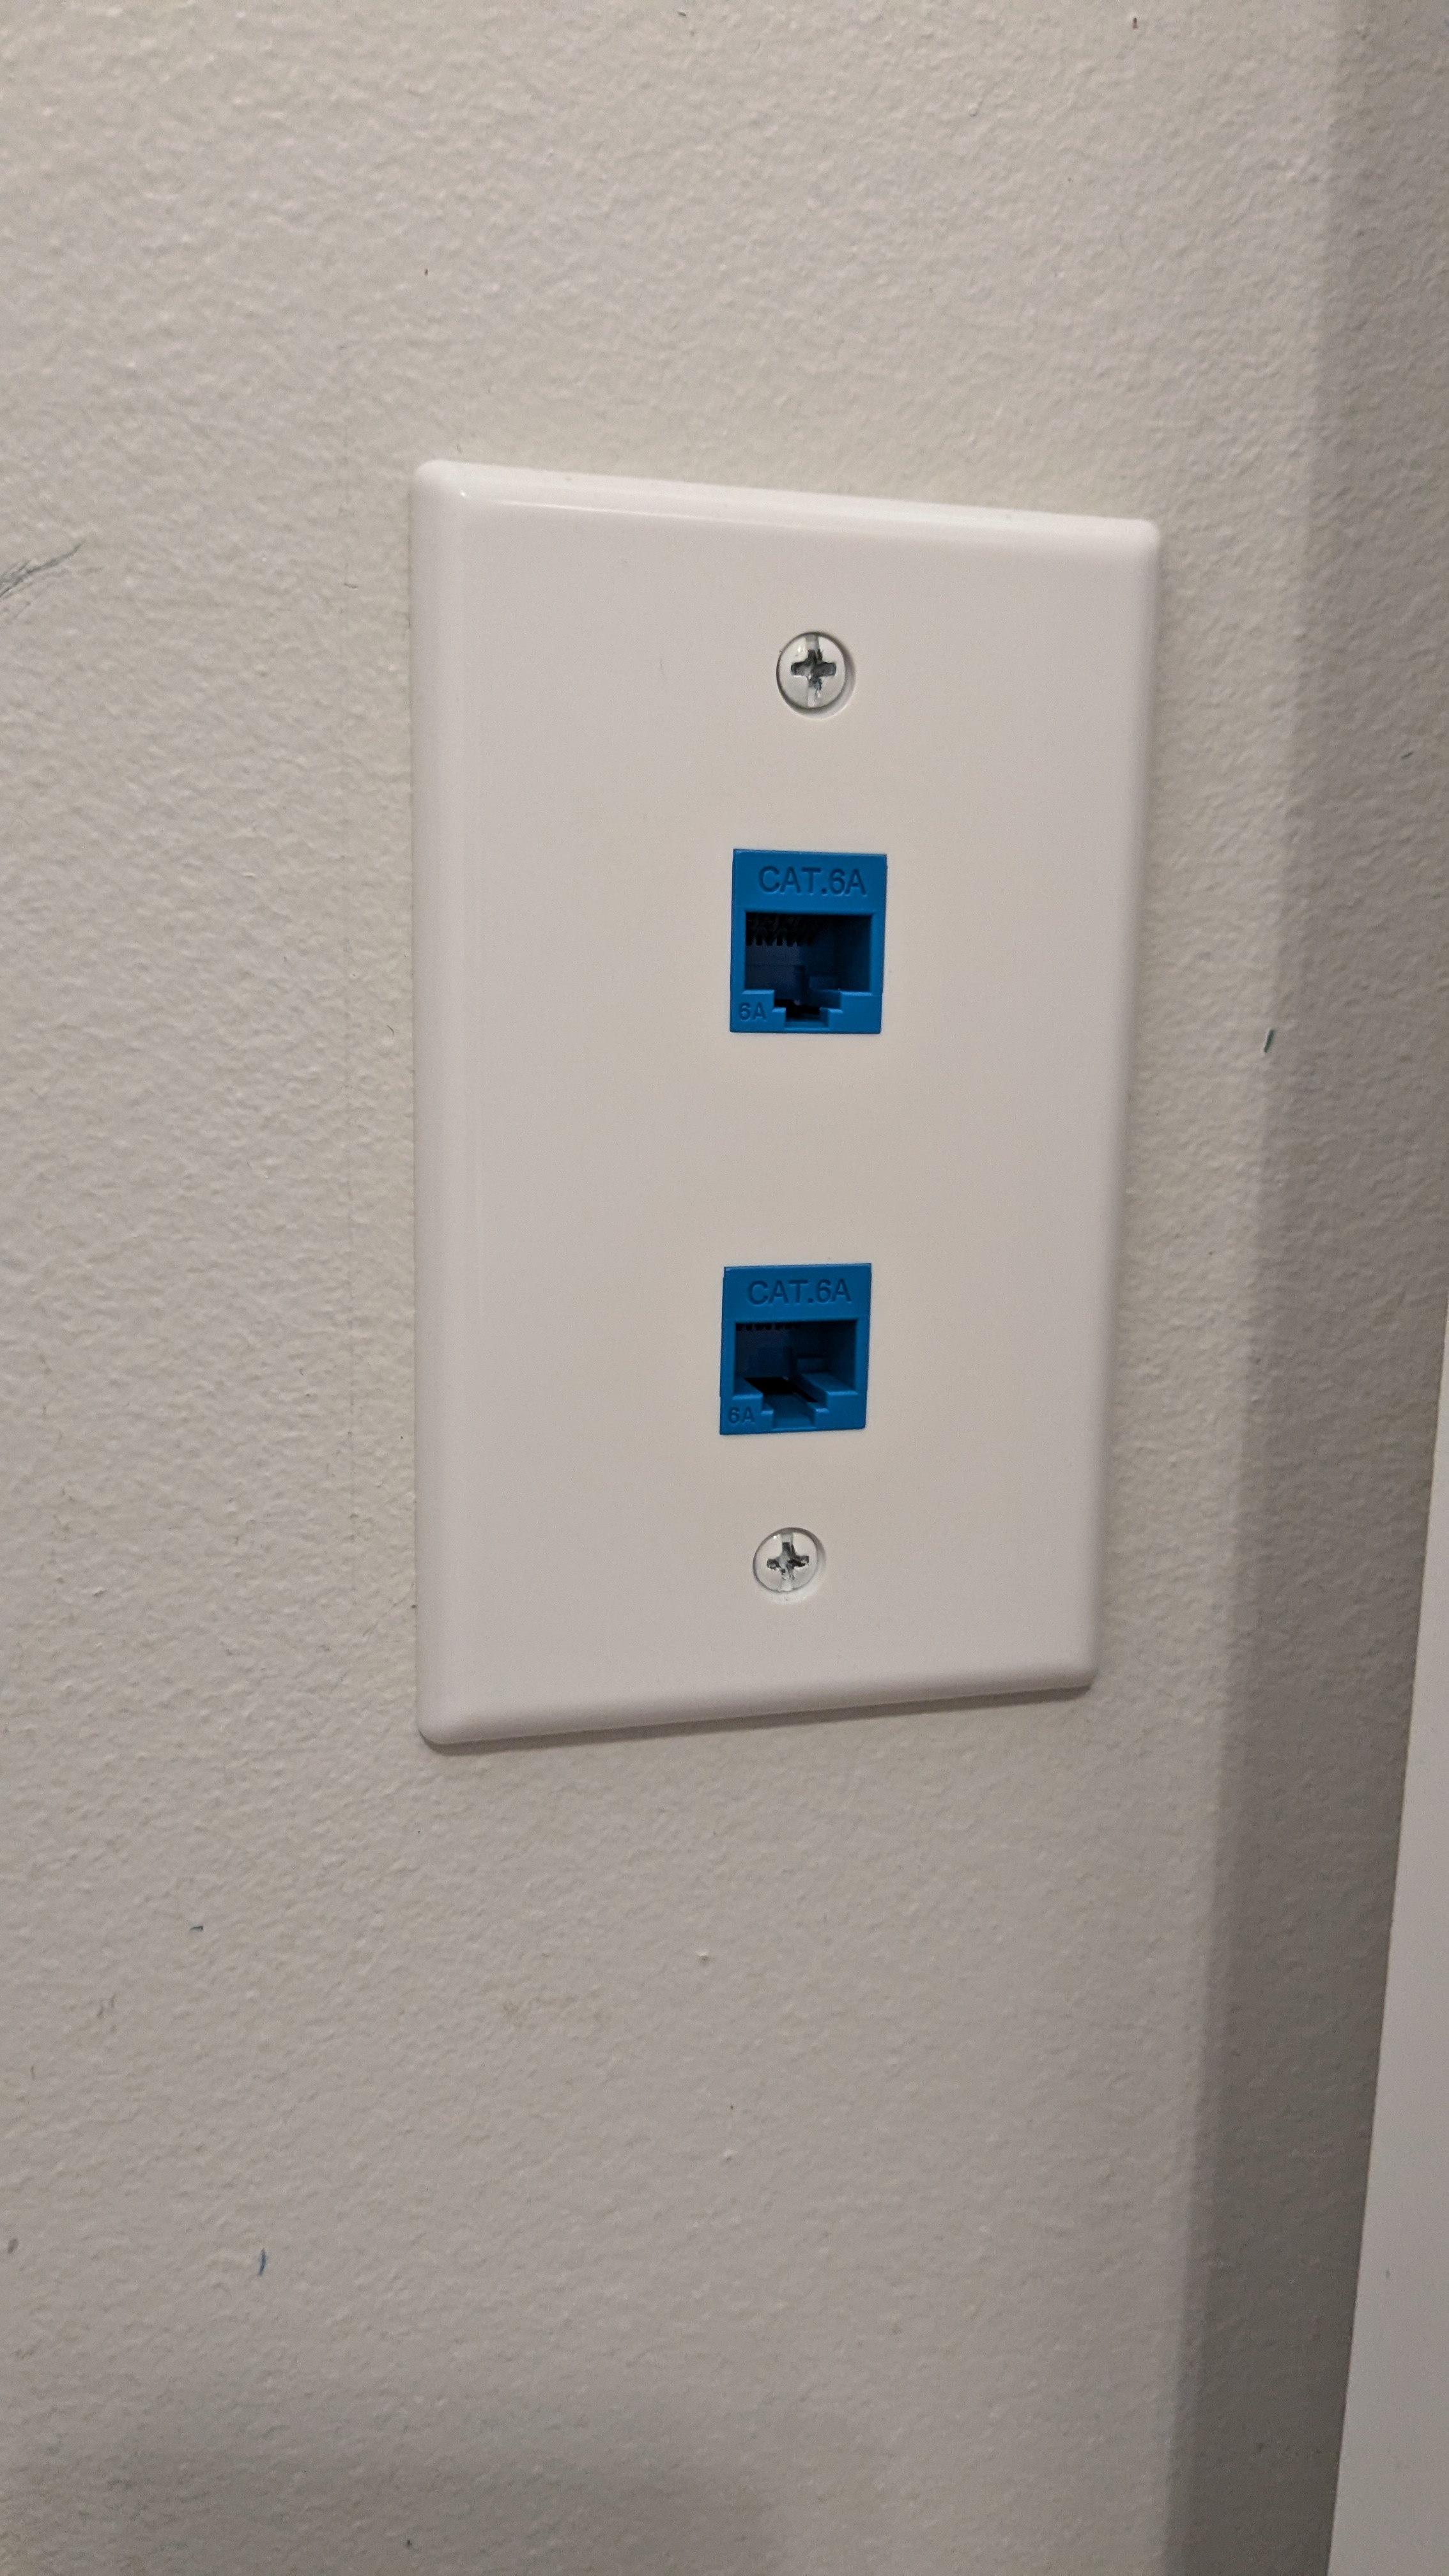
For wall connections I went with keystone faceplates. The alternatives are Decora/decorator faceplates or faceplates with fixed Ethernet ports, but keystone seems like the most common, I like the way they look, and I like the ability to mix and match connections. It was hard to find keystone jacks marketed as Cat 6A. And actually I think my punch-down block is only marketed as Cat 6. I think the “A” in “6A” probably does make a difference for the cable in long cable runs, but in practice I suspect it matters much less for the jacks. Also even Cat 6 is overkill for my needs. But, you know, if you’re going through the effort to put cable in walls then you should use the best cable.
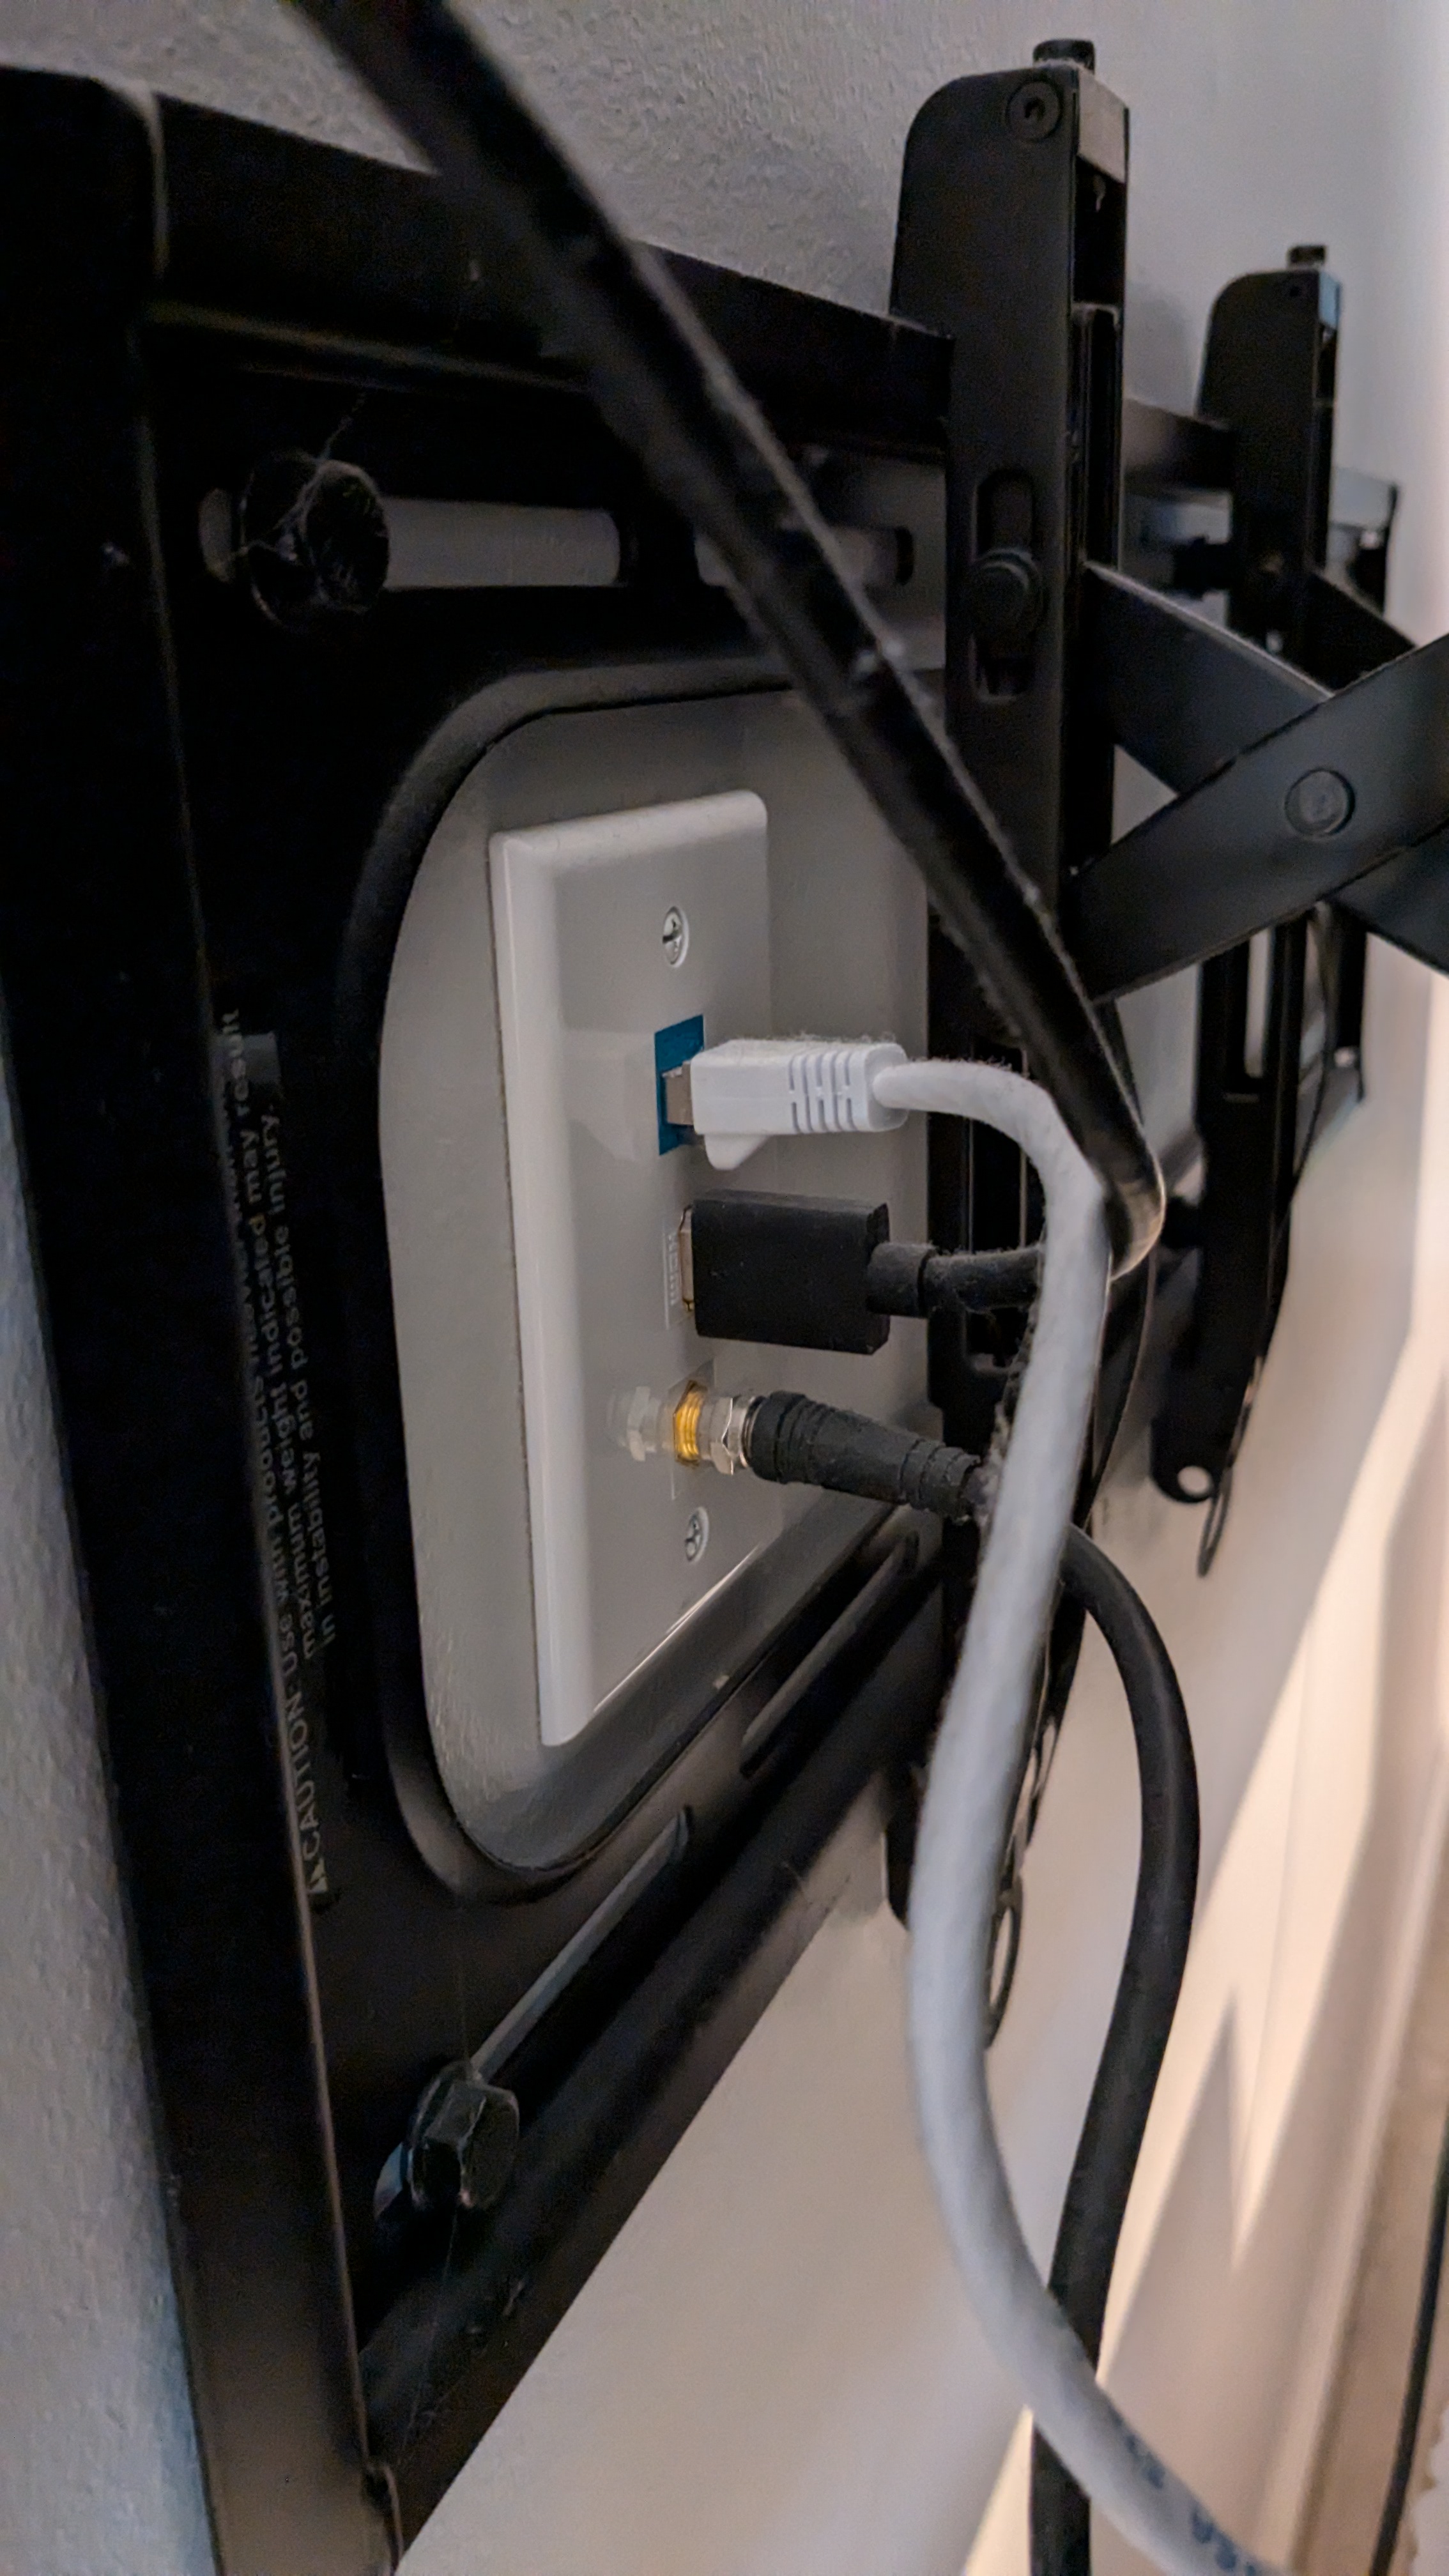
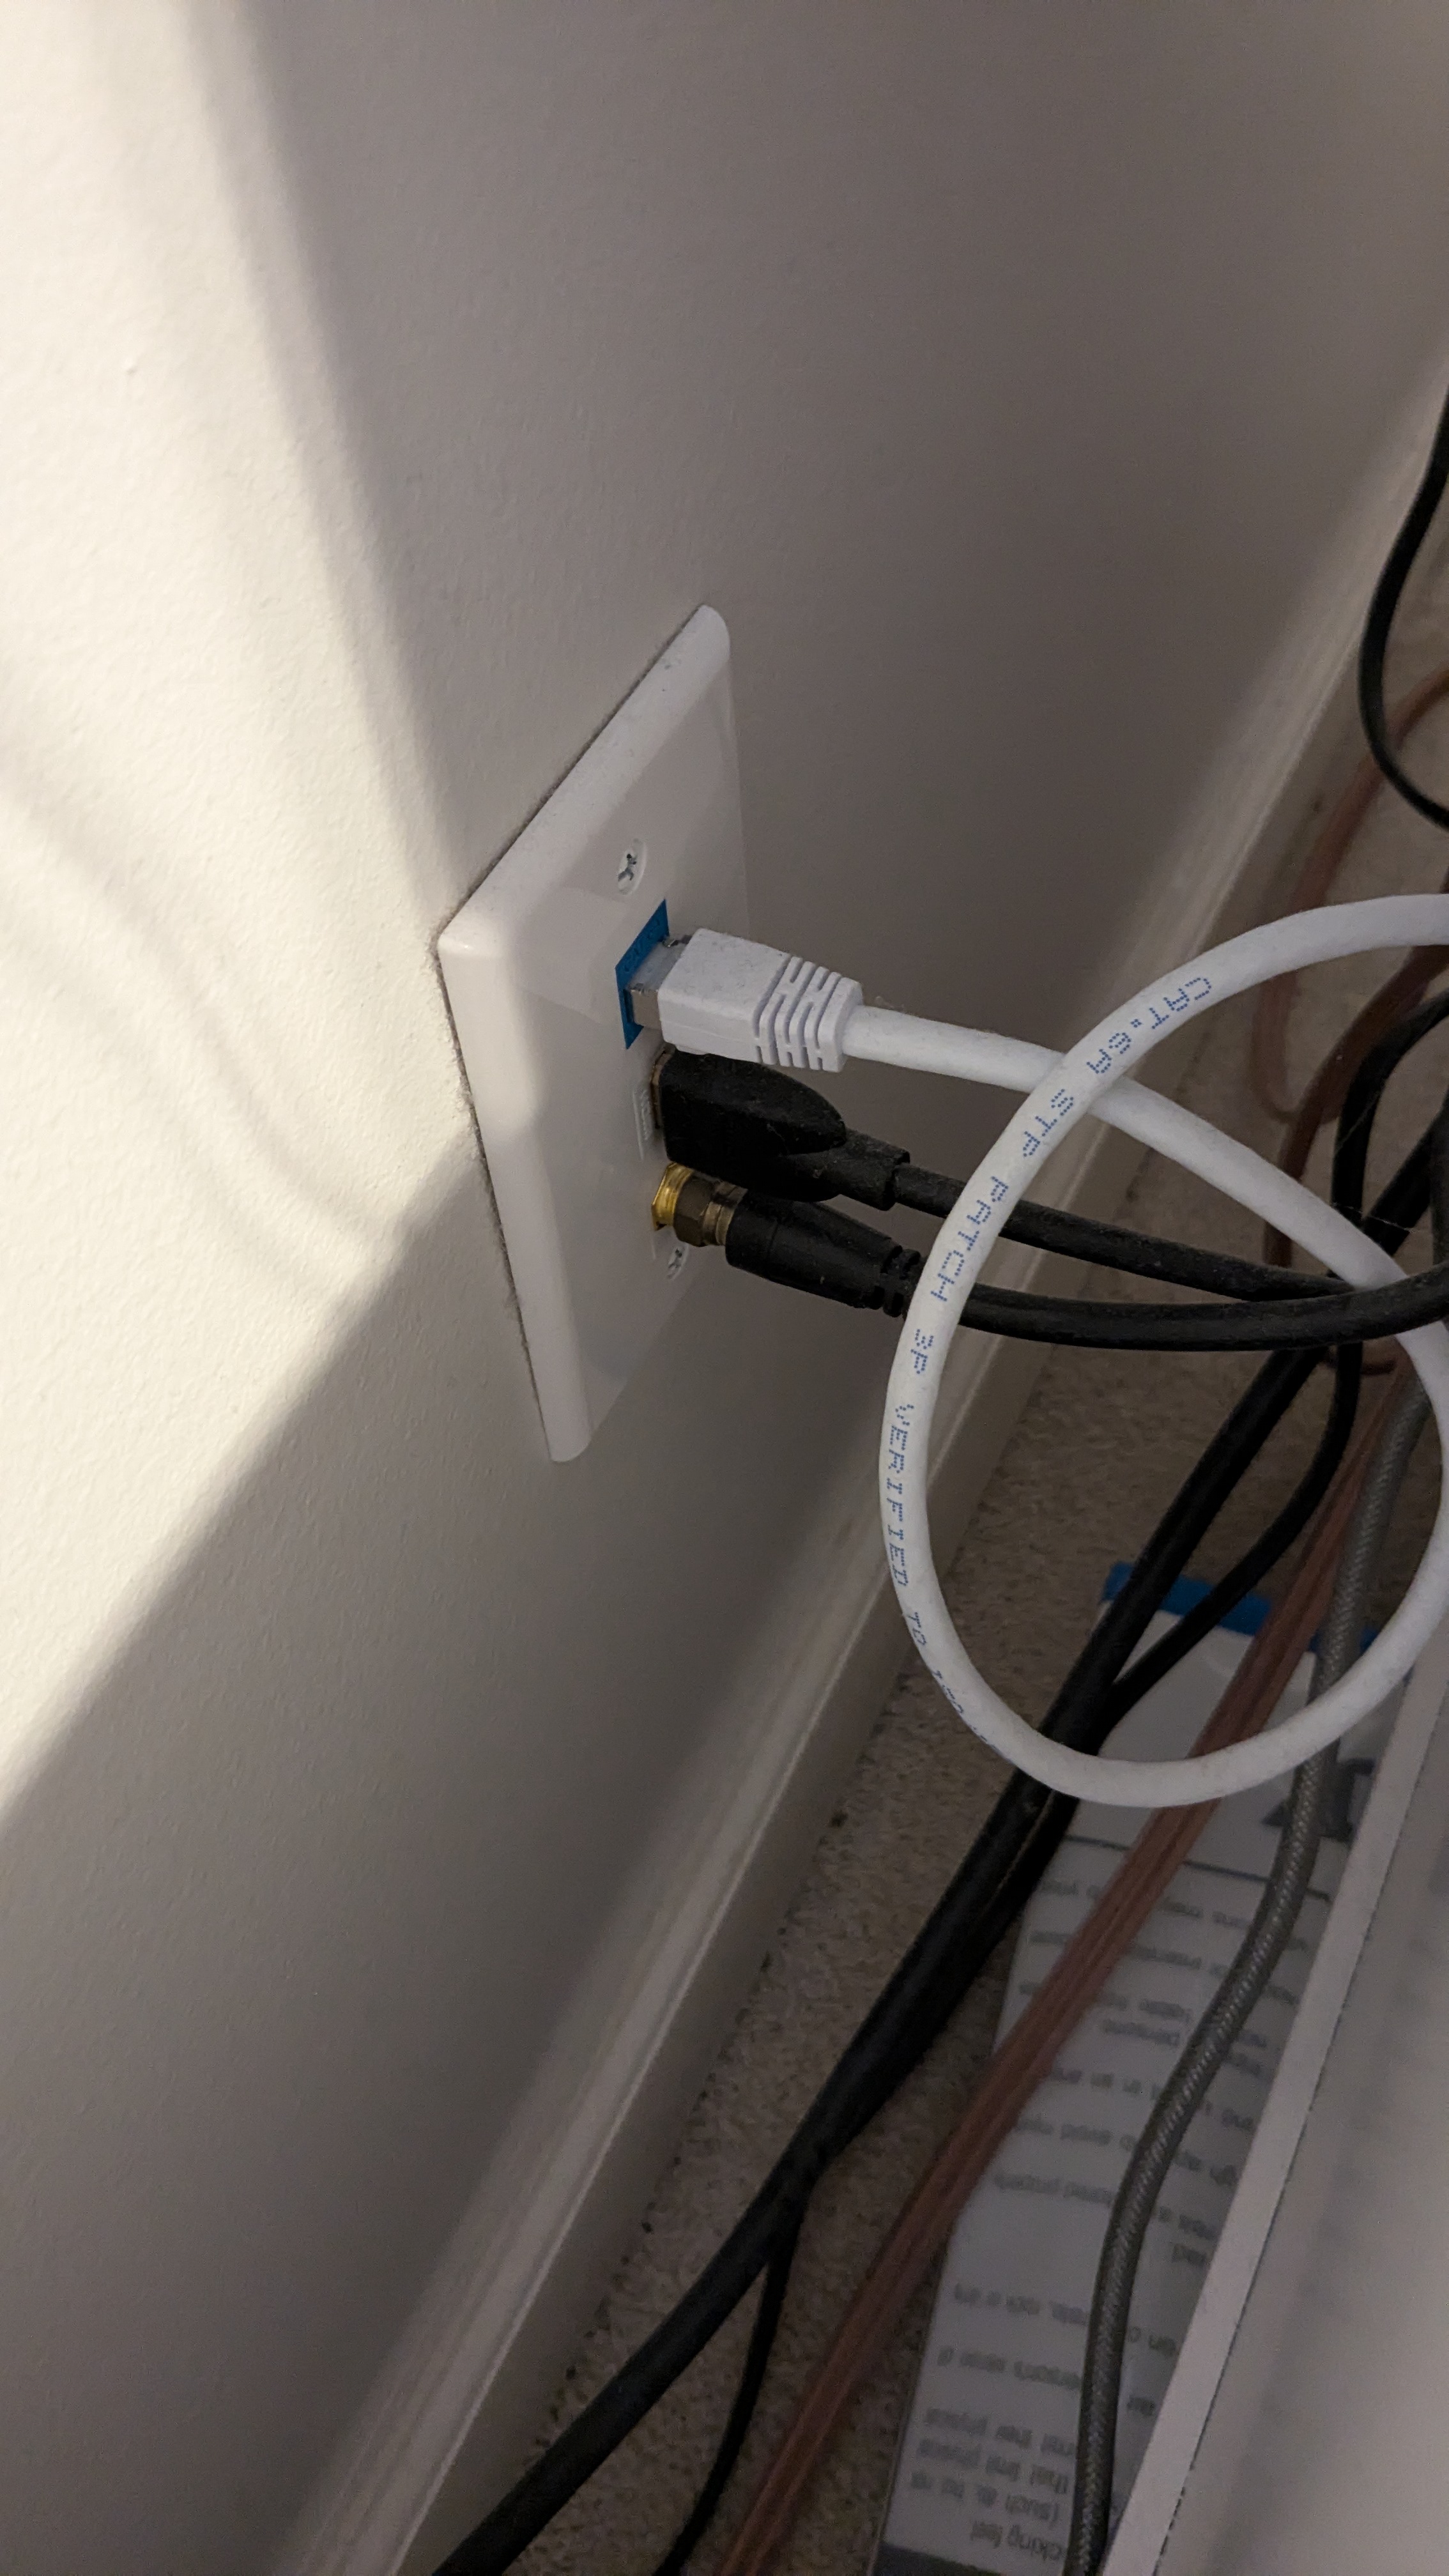
The second photo is behind the TV and the third photo is behind the stereo receiver below the TV. The HDMI connection runs between them. The coax behind the TV connects to an attic-mounted HDTV antenna. The coax behind the receiver connects to an attic-mounted FM radio antenna.
I used low voltage mounting brackets on interior walls. I used a normal electrical box on the one exterior wall to give some separation from the insulation.
Router
For networking gear I chose to use my own router rather than the one from my ISP because I’m wary of router firmware. I worry that router manufacturers aren’t careful enough and their firmware can be buggy and hackable. We have Google Fiber and I’d guess that Google’s router firmware is above average, but I still thought I could do better. Ubiquiti and Meraki (owned by Cisco) are companies that give me an impression of a high level of security. Maybe Aruba, too. I went with Ubiquiti because it was the personal and professional choice of some smart former coworkers.
Narrowing down which Ubiquiti devices took some time. I went with a UniFi Security Gateway. Configuration takes more work than with more mainstream consumer-focused routers. Those routers typically host the admin website directly on the router. With UniFi the management website is a separate thing. UniFi sells a separate hardware device called a Cloud Key that’s basically a mini computer that hosts the admin website, but that’s one more thing to cram into the structured media enclosure and also it’s $179. Another option is to use a hosted solution, but it seems ridiculous for me to pay $15 or $30 per month for my home network. And using a hosted solution is inherently less secure. Instead I opted to run the configuration service on my own hardware. At first I ran it natively on my Apple laptop but I’ve since switched to running it in a Docker container on my Linux desktop. I wrote up the steps on Super User if you want more info.
It’s been a few years since I did all this work and nowadays there might be better options. For example I think Ubiquiti sells some gateways that include the admin website. The Dream Router and Dream Machine both look like good options if you’re not trying to mount it in a structured media enclosure. And the Dream Machine Pro and Dream Machine Special Edition might be good if you’re mounting in a rack. More info here and here.
Network Configuration
Unfi allows configuration of multiple logical networks, and UniFi access points can act as multiple SSIDs simultaneously. I take advantage of this by having one network where devices are allowed to talk to each other (e.g. our computers and printer) and another, “untrusted” network where devices are not permitted to talk to each other. I love this. I relegate things like my thermostate and car to this network. They don’t need to talk to anything else on my network and having them isolated means they’re not an attack vector into my personal computers.
Access Points
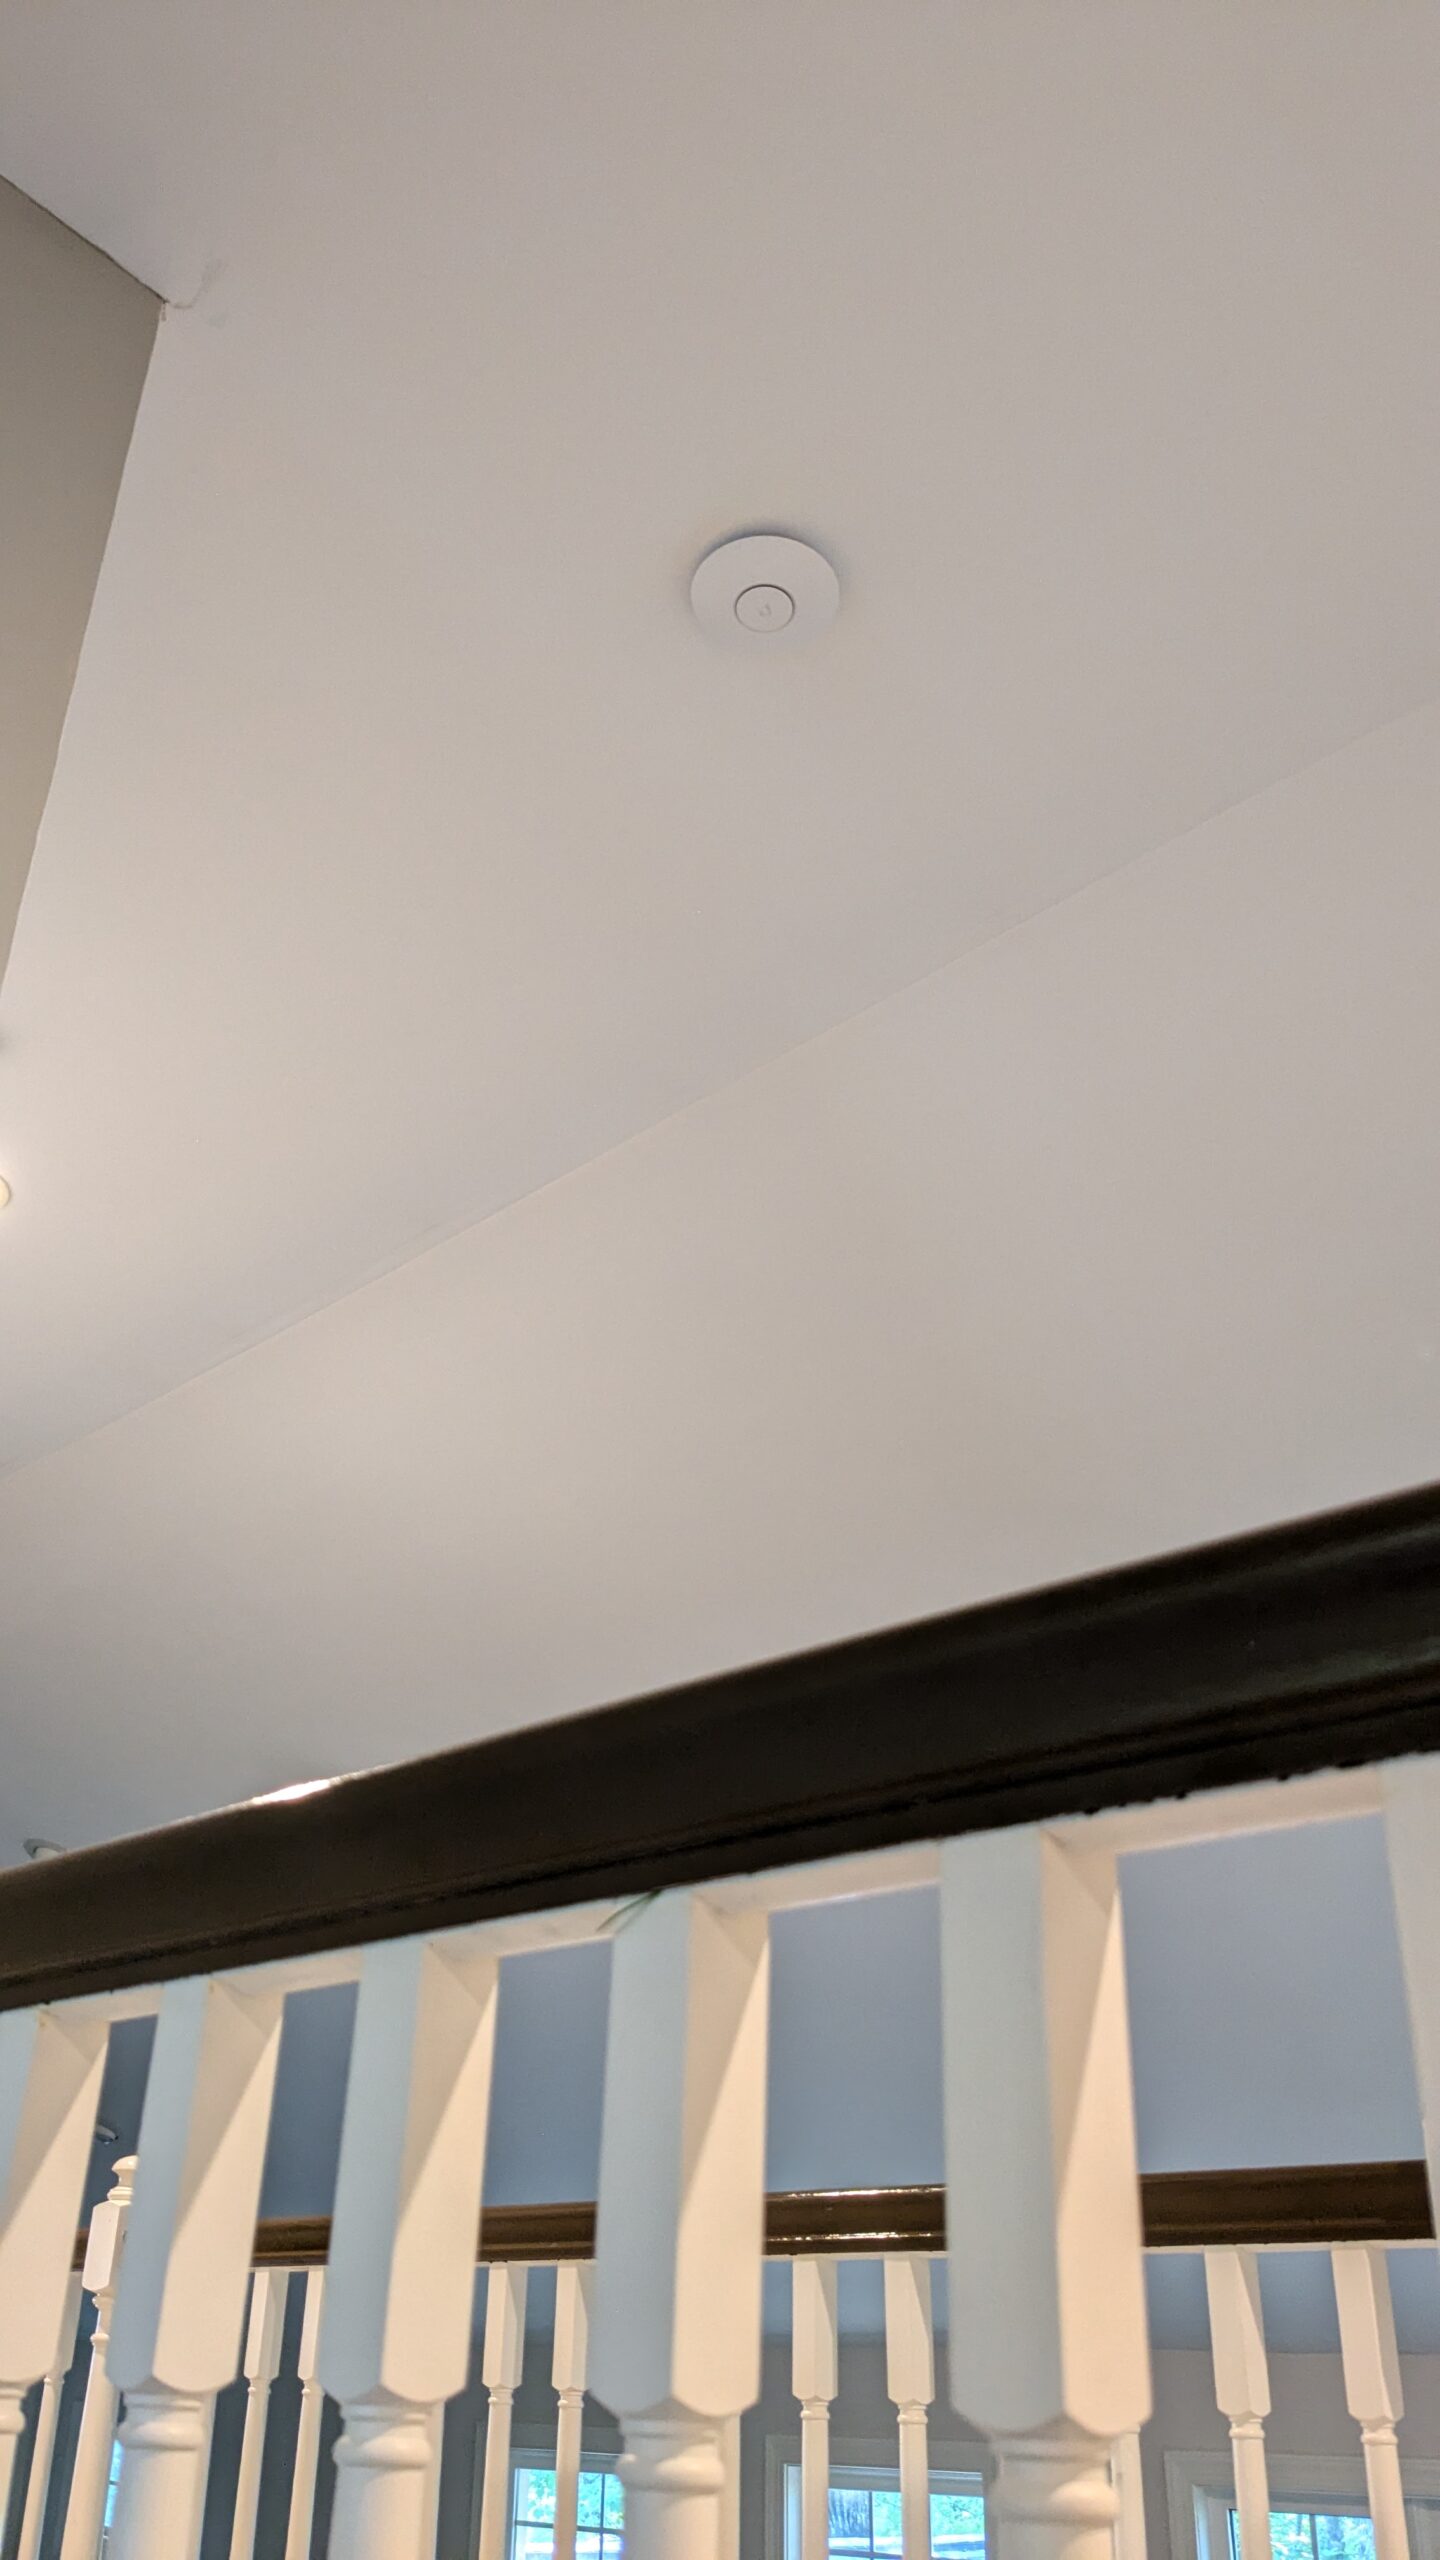 Another decision was how many access points and where to put them. This depends entirely on the layout of the house and my solution isn’t great. Our house has a big open room in the middle with a hall/balcony/catwalk upstairs that’s open to the downstairs. I ended up putting one access point in the middle of this hall and it’s probably sufficient to cover the whole house. I also put an access point in the office with the intent of improving reception for the nearby rooms, which have some walls between them and the upstairs hall access point. But this second access point is probably excessive.
A note about access point placement: It’s better to put them in the middleish rather than at the extreme ends because signal degrades quickly over distance. See this Ars Technica article for more.
I wish Ubiquiti had a smaller product lineup. When I purchased my APs years ago there were thirteen different access points to choose from! That’s not counting mesh or APs that mount to a 1 gang wall box. It was hard to decide between them. It’s down to eight now, apparently, but I still have a hard time believing there are justifiable differences between all of them.
Mounting the AP to the ceiling was hard and I’m not completely satisfied with the solution. See “Mistakes/Learnings” below for more detail.
Switch
UniFi access points are powered with PoE (Power over Ethernet). That’s kind of nice and easy, but it meant I needed a switch that is capable of supplying power over ethernet. I bought a non-Ubiquiti, unmanaged PoE switch. It’s fine but I wish I had spent more money and gotten a single, bigger, managed PoE switch from Ubiquiti. See “Mistakes/Learnings” below for why.
Mistakes/Learnings
- I should have bought a single, bigger, managed, PoE switch for the structured media enclosure. Or maybe a smaller PoE switch but a bigger managed switch? Using a managed switch would allow putting hard-wired Ethernet devices on the untrusted network. This is nice for IoT (Internet of Things) devices that might be poorly written (e.g. a TV) and a potential attack vector for people to gain access to your home network. And a single switch would have made the enclosure less cluttered.
- I maybe should have used a rectangular wall box for the ceiling-mounted access point. I used a round old-work ceiling box. My impression is round boxes are the standard for electrical (lights) in ceilings. It seemed like a natural choice to me since access points are round. Putting a rectangular box in the ceiling felt wrong (though I’ve since realized that rectangular boxes might be more common than round boxes for smoke detectors). But for whatever reason it seems like Ubiquiti doesn’t expect round boxes to be used. They sell an access point mounting bracket but it doesn’t support attaching to a round ceiling box. Another problem is that the nanoHD AP is so small that you can see the blue edges of the ceiling box. I don’t remember exactly how I solved this problem, but I think it involved attaching the AP’s included mounting bracket to a blank cover for the round box and cutting a hole in both to be able to feed the Ethernet cable through. The cleanest fix for this problem is probably to replace the round box with a small rectangular box. That’s a significant amount of effort since it requires drywall repair.
- I should have bought surge receptacles with USB outlets for the structured media enclosure. I could have avoided a separate power adapter for the Google fiber⇔Ethernet converter.
- I accidentally cut into the drywall a little bit where a stud was when trying to place a box in the office for Ethernet jacks.
- I overestimated how much Ethernet I would need and also made my lengths too long. Also maybe the fiber cable.
- I used pestblock Great Stuff Foam to seal one or two of the holes I drilled for running cables. I should have used fireblock for all of them. I don’t know if Fireblock is required by code, but it’s something I worried about later. I mean, it basically doesn’t matter, but if you’re picking one I’d go with Fireblock.
- When cutting holes for old work boxes, make the hole on the small side. It’s easy to make it bigger but hard to make it smaller.
Full Product List
- Leviton 49605-42P – 42″ Wireless Structured Media Enclosure with Vented Hinged Door, Plastic, White
- Leviton 49605-42T – Trim Ring Accessory for 42″ Structured Media Center, Plastic, White. This is a fascia that covers the gap between the outside of the enclosure and the drywall.
- Leviton 49605-GRM – Grommet Accessory Pack for Structured Media Centers, includes (3) 1″ and (2) 2″ rubber grommets. Works with all enclosure knockouts. I think the enclosure doesn’t come with these&mbdash;they must be purchased separately.
- Leviton 49605-AFR – Cable Routing Ring with (2) Push Pins. For coiling fiber. This thing is great.
- Leviton 47605-ACS – J-Box Surge Protective Kit (one duplex blue receptacle). Two of these mounted in the bottom of the enclosure. I had an electrician wire them into an existing circuit.
- Leviton 47612-DBK – Data Plastic Bracket. These are the main brackets I used for mounting devices. Mostly the mounting holes on the backs of things lined up with the holes in these brackets. I did have to drill holes in one of the brackets for one of the devices. And I had to find some screws and nuts and a local hardware store that were an appropriate size.
- Leviton 47612-UBK – Universal Shelf Bracket used with Structured Media Center (discontinued). The SmartThings hub is sitting on this. Leviton sells a plastic shelf that could serve the same purpose.
- Leviton 49605-AST – Saddle Tie Kit with VELCRO®, includes (5) Saddle Ties, 5′ of VELCRO® SoftCinch, Black. I think I used these to strap down power adapters. They’re convenient but look messy.
- Leviton 47615-NYL – Push-Lock Pins for Structured Media Centers (Bag of 20). Because I broke one of the ones that came with a mounting bracket.
- Monoprice Entegrade Series 1000FT Cat6A Plus 650MHz UTP Solid, Riser-Rated (CMR), 23AWG, Bulk Bare Copper Ethernet Network Cable, 10G, Blue – Ethernet cable. 1,000 ft was more than I needed, but 500 ft probably would not have been enough. But it did allow me to be generous with my cable lengths in case anyone ever wants to move them, and I still have some cable left over.
- Monoprice product #7013 – 1-Gang Low Voltage Mounting Bracket
- Monoprice product #6727 – Wall Plate for Keystone, 2 Hole – White
- Monoprice product #6729 – Wall Plate for Keystone, 3 Hole – White
- Monoprice ethernet patch cables – I bought a bunch of these, mostly for the enclosure. Also some white cables for the office because I didn’t have any and they look nice. I bought “Cat6A Ethernet Patch Cable – Snagless RJ45, 550Mhz, STP, Pure Bare Copper Wire, 10G, 26AWG” which appear to be discontinued. STP wasn’t important… I think maybe the only UTP cable they had was “slim” and I wanted to avoid that because it sounds worse.
- Ubiquiti Unifi Security Gateway (USG) – Discontinued. Maybe the Gateway Lite is the spiritual successor to the USG? I’m not sure how similar they are, or if the Gateway Lite has notches on the back for wall-mounting.
- Ubiquiti UAP-nanoHD – UniFi nanoHD access point
- Netgear GS108PP – 8-Port Gigabit Ethernet Unmanaged PoE Switch